Difference between revisions of "Cavity by Joel Guerrero"
Jump to navigation
Jump to search
Andy Heather (talk | contribs) (Updated link) |
|||
| (26 intermediate revisions by 3 users not shown) | |||
| Line 1: | Line 1: | ||
| − | * ''' | + | [[category:basic tutorial]] |
| + | [[category:laminar]] | ||
| + | * '''contributor''': Joel Guerrero | ||
* '''affiliation''': Universita degli Studi di Genova, Wolf Dynamics | * '''affiliation''': Universita degli Studi di Genova, Wolf Dynamics | ||
| − | * '''contact''': joel.guerrero@unige.it | + | * '''contact''': <mail address='joel.guerrero@unige.it' description='author'>click here for email address</mail> |
| − | * '''OpenFOAM version''': | + | * '''OpenFOAM version''': 7 |
* '''published under''': CC BY-SA license ([https://creativecommons.org/licenses creative commons licenses]) | * '''published under''': CC BY-SA license ([https://creativecommons.org/licenses creative commons licenses]) | ||
Go back to [https://wiki.openfoam.com/index.php?title=Day_2 Day 2]. | Go back to [https://wiki.openfoam.com/index.php?title=Day_2 Day 2]. | ||
| − | =[http://www.wolfdynamics.com/ | + | =[http://www.wolfdynamics.com/wiki/tut_cavity.pdf The driven cavity case - Revisited]= |
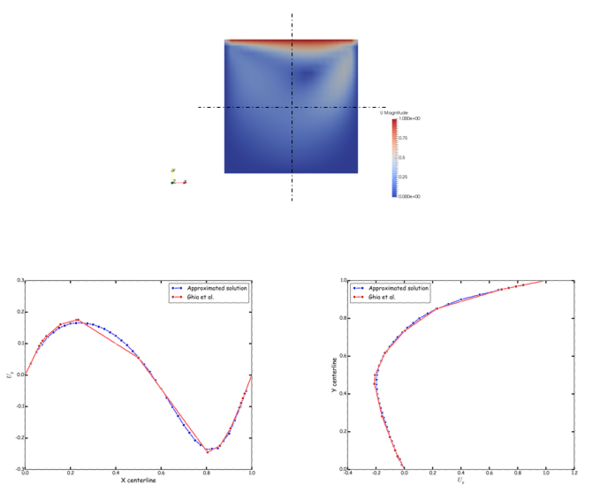
| − | + | [[File:joegi_f11.png|600px|right|Driven cavity]] | |
| − | + | In this [http://www.wolfdynamics.com/wiki/tut_cavity.pdf tutorial], we revisit the classical driven cavity case and we dissect every single dictionary of the case directory. You will learn about, | |
| − | |||
| − | |||
| − | |||
| − | |||
| − | |||
| − | + | * Directory structure of an OpenFOAM case | |
| + | * Simulation workflow | ||
| + | * Saving log files | ||
| + | * How to control the simulation | ||
| + | * Understanding the screen output | ||
| + | * Basic post-processing with paraFoam | ||
| + | * Basic meshing with blockMesh | ||
| + | * Monitoring the solution | ||
| + | * How to interpret errors | ||
| + | * Sampling and plotting | ||
| − | |||
| − | + | You can download the case files at this [http://www.wolfdynamics.com/wiki/cavity2D.tar.gz link]. | |
| − | |||
| − | + | Go back to the [https://wiki.openfoam.com/Collection_by_authors#Joel_Guerrero contributions page]. | |
Latest revision as of 10:00, 6 January 2020
- contributor: Joel Guerrero
- affiliation: Universita degli Studi di Genova, Wolf Dynamics
- contact: click here for email address
- OpenFOAM version: 7
- published under: CC BY-SA license (creative commons licenses)
Go back to Day 2.
The driven cavity case - Revisited

In this tutorial, we revisit the classical driven cavity case and we dissect every single dictionary of the case directory. You will learn about,
- Directory structure of an OpenFOAM case
- Simulation workflow
- Saving log files
- How to control the simulation
- Understanding the screen output
- Basic post-processing with paraFoam
- Basic meshing with blockMesh
- Monitoring the solution
- How to interpret errors
- Sampling and plotting
You can download the case files at this link.
Go back to the contributions page.