Difference between revisions of "OneraM6 by Michael Alletto"
(→Set up) |
|||
| Line 26: | Line 26: | ||
===Mesh generation=== | ===Mesh generation=== | ||
| + | |||
| + | Note that the available step file which defines the wing surface at the NASA turbulence model resource home page, can be converted with available online tools to a stl file which is required by snappyHexMesh. Just type convert step to stl in google and you will get a few in the first result which are doing the job well. | ||
| + | The next figures shows the meshing strategy adopted. Five refinements regions are chosen to gradually increase the resolution from the coarsest level to the finest level around the wing. The initial grid had hexagonal cells of 1.2m side length. Note that it is very important to start with cells which are cubes to get a high wall layer coverage near the surface if wall layers are used. The fifth refinement level has a cell side length of 0.0375 m. The surface around the wing is additionally refined to capture the fine curvature at the wing nose and the tail. For the surface a refinement level 8 and 9 was used. For coarser levels the nose of the wing was too coarsely resolved. This strategy results in a mesh of approximately 10<sup>6</sup> cells. Five layers are used to increase the wall normal resolution to capture the sharp velocity gradients near the wall. The layer coverage is roughly 94%. | ||
| + | |||
| + | [[File:meshFront_oneraM6_alletto.png|800px|center|mesh front]] | ||
| + | |||
| + | [[File:meshWing_oneraM6_alletto.png|800px|center|surface mesh wing]] | ||
===Simulation setup=== | ===Simulation setup=== | ||
Revision as of 13:31, 27 October 2020
- contributor: Michael Alletto
- affiliation: WRD MS
- contact: click here for email address
- OpenFOAM versions: v2006
- Published under: CC BY-NC-ND license (creative commons licenses)
Go back to Collection by authors.
Contents
Transonic flow around the 3D Onera M6 wing at an angle of attack of 3.06°
You can download the case file [1] here.
Introduction
The scope of this tutorials is to test the capability of the solver rhoSimpleFoam in combination with the OpenFOAM native mesher snappyHexMesh to simulate 3D transonic flows over wings. For this purpose we take as test case the Onera M6 wing listed in the NASA turbulence model resource home page https://turbmodels.larc.nasa.gov/index.html. The home page provides a list of test cases to validate turbulence models for compressible and incompressible flows. The flow around the Onera M6 wing is taken as one of the standard test cases to validate compressible flow solvers (see, e.g. [1],[2],[4]).
Set up
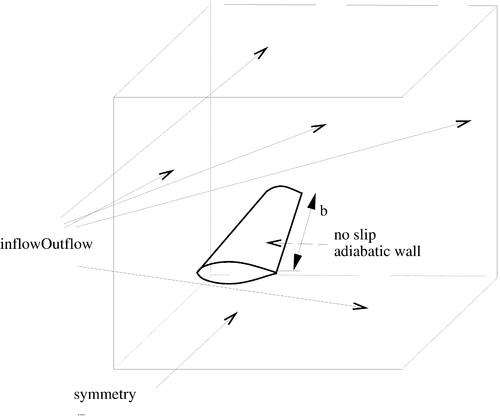
The next figure shows a sketch of the setup. The Onera m6 wing consists in a swept wing with a span b of 1.196 m. The domain consists in a rectangular box where the edges are located 18 m from the wing root which is approximately 17 times the span width. This domain size should reduce the influence of the artificial boundary conditions on the results to a minimum. On the side of the box which is located at the wing root a symmetry boundary conditions is applied. For all other sides a inflow-outflow boundary conditions is used for all quantities but the pressure. For this boundary conditions a fixed value is used if the flow points inside the domain and a zero gradient is used if the flow points outward the domain. For the pressure a outflow-inflow boundary condition is used. Here the zero gradient boundary condition is used for incoming flow and a fixed value for outgoing flow. The free stream mach number is set to Ma = 0.84 and the angle of attach is set to α = 3.06°. The Reynolds number was approximately Re = 107. The numerical schemes are taken from the tutorials shown in https://wiki.openfoam.com/NACA0012_numerical_schemes_variation_by_Michael_Alletto. In this tutorial a detailed motivation is found we to choose a linear scheme for the convective schemes. The Spalart-Almaras turbulence model was chosen since in the tutorial https://wiki.openfoam.com/NACA0012_turbulence_model_variation_by_Michael_Alletto it showed the best agreement between simulation and experiment regarding shock position and strength.
Mesh generation
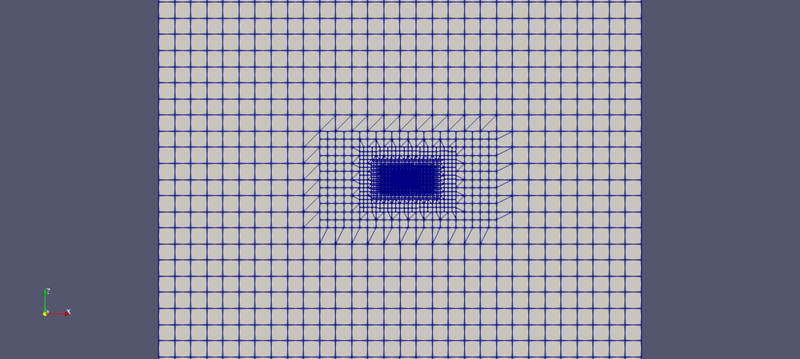
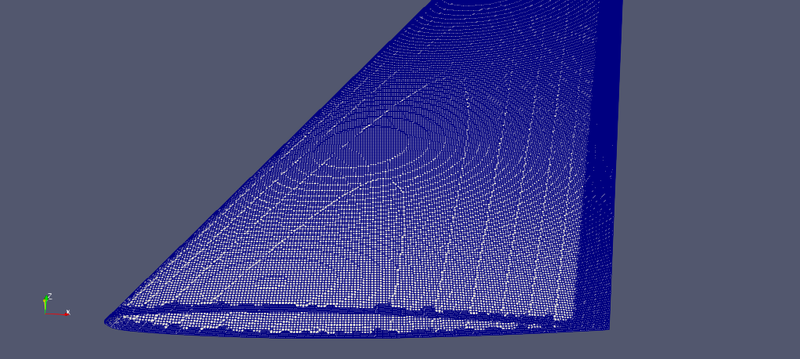
Note that the available step file which defines the wing surface at the NASA turbulence model resource home page, can be converted with available online tools to a stl file which is required by snappyHexMesh. Just type convert step to stl in google and you will get a few in the first result which are doing the job well. The next figures shows the meshing strategy adopted. Five refinements regions are chosen to gradually increase the resolution from the coarsest level to the finest level around the wing. The initial grid had hexagonal cells of 1.2m side length. Note that it is very important to start with cells which are cubes to get a high wall layer coverage near the surface if wall layers are used. The fifth refinement level has a cell side length of 0.0375 m. The surface around the wing is additionally refined to capture the fine curvature at the wing nose and the tail. For the surface a refinement level 8 and 9 was used. For coarser levels the nose of the wing was too coarsely resolved. This strategy results in a mesh of approximately 106 cells. Five layers are used to increase the wall normal resolution to capture the sharp velocity gradients near the wall. The layer coverage is roughly 94%.
Simulation setup
Results
References
[1] J Mayeur, A Dumont, D Destarac, and V Gleize. Reynolds-averaged navier–stokes simulations on naca0012 and onera-m6 wing with the onera elsa solver. AIAA Journal, 54(9):2671–2687, 2016.
[2] Davide Modesti and Sergio Pirozzoli. A low-dissipative solver for turbu- lent compressible flows on unstructured meshes, with openfoam imple- mentation. Computers & Fluids, 152:14–23, 2017.
[3] Fadl Moukalled, L Mangani, Marwan Darwish, et al. The finite volume method in computational fluid dynamics, volume 113. Springer, 2016.
[4] L Remaki, O Hassan, and K Morgan. Aerodynamic computations using a finite volume method with an hllc numerical flux function. Mathematical Modelling of Natural Phenomena, 6(3):189–212, 2011.


